Software Renderer in Odin from Scratch, Part XIV
2nd March 2026 • 16 min read
In the previous part, we added support for multiple lights with different colors, and the series is almost complete. The last thing we're going to implement together is support for multiple meshes, or, rather, multiple models. But what is a model, and how does it differ from a mesh?
So far, we've worked with one mesh and one texture that we both create in our main procedure, where we also create translation, rotation Vector3s, and scale f32, which we pass via reference to our HandleInputs procedure to be eventually modified with keyboard inputs, and then we use them to make our matrices with MakeTranslationMatrix, MakeRotationMatrix and MakeScaleMatrix procedures respectively. Then, we multiply them in the order of rotation, scale, and translation to get the modelMatrix, and we use the camera to create the viewMatrix to multiply the modelMatrix with. The resulting matrix, which we override viewMatrix with since we no longer need it at this point, is then passed to the ApplyTransformations procedure, where we apply all these transformations to mesh.vertices and mesh.normals and using Mat4MulVec3procedure, storing the results in the mesh.transformedVertices and mesh.transformedNormals respectively.
This was a very brief refresher of what we've already learned in Part III, Part IV, and Part V. Pause for a moment and think about what you'd do if you'd like to render more than one mesh. If you came up with an idea that involves encapsulating mesh, texture, translation, rotation, and scale into a separate struct, then kudos to you. That's exactly what we're going to do, and our new struct will be named Model.
Later, we're going to iterate over a collection of models to render them all on the screen, each with a different texture and mesh. We're also going to keep a reference to the currently selected model, and we'll be able to select a model with the up and down arrow keys. The currently selected model will be the one we'd be able to move, rotate, and scale using input bindings we already implemented in the inputs.odin file. But first, we need to implement the model.odin file.
If you want to follow along, and as always, I encourage you to do so, download the box.png file into your assets directory.
Implementing model.odin
Add a new file to our project, name it model.odin, and after the usual package definition import raylib and define the Model struct.
package main

import rl "vendor:raylib"

Model :: struct {
    mesh: Mesh,
    texture: Texture,
    color: rl.Color,
    wireColor: rl.Color,
    translation: Vector3,
    rotation: Vector3,
    scale: f32,
}
As you can see, our model has mesh and texture, but also a color we're going to render the model with in rendering pipelines that don't involve texture mapping, and wireColor, a color specifically for wireframe rendering pipelines. Each model will have its own translation, rotation, and scale, and even though the Model struct is a new struct, fundamentally, we don't really add anything new; the Model just encapsulates already known data, so we can work with multiple instances more conveniently.
Technically, a single model could consist of more meshes and more textures, and each mesh could have its own translation, rotation, and scale. Think of a car with four wheels. You want to rotate wheels at runtime separately while moving the entire car forward, so you might create a model with five meshes, four for wheels, and one for the rest of the car, then you'd be able to rotate the wheels relative to their origin along the horizontal axis while you'd move the entire model forward by adding to its translation's forward axis. With good timing, that means the speed of the rotation of the wheels would match the forward movement of the entire model, you'd get a convincing animation of a car driving forward.
Multiple textures can be grouped into materials, which is something we'd do if our renderer supported, for example, bump maps for greating illusion of uneven surface and specular maps to affect how lights scatters on different parts of the mesh, becase metal reflects light differently than wood for instance, but to keep things simple, our implementation will support only models with one mesh and one texture, often called a diffuse or albedo texture, and since we have only one, we just call it simply a texture.
Now, let's create a factory procedure, but this time we're going to call it LoadModel instead of MakeModel, and the implementation will be very simple, because we already have procedures for loading mesh implemented in mesh.odin and for loading textures in texture.odinso we can just delegate the heavy lifting to them, passing paths to OBJ file and image file and assigning the return values to mesh and texture for the model respecively. The remaining members of the Model struct we can simply initialize to reasonable default values.
LoadModel :: proc(meshPath: string, texturePath: cstring, color: rl.Color = rl.WHITE, wireColor: rl.Color = rl.GREEN) -> Model {
    return Model{
        mesh = LoadMeshFromObjFile(meshPath),
        texture = LoadTextureFromFile(texturePath),
        color = color,
        wireColor = wireColor,
        translation = Vector3{0.0, 0.0, 0.0},
        rotation = Vector3{0.0, 0.0, 0.0},
        scale = 1.0
    }
}
Now, since we have introduced the concept of a model to our code base, I think it's a good idea to refactor the logic for creating and applying transformation matrices from our main.odin file into a pair of coupled procedures here in the model.odin file. The new ApplyTransformations procedure will accept a reference to a model and a camera and based on the camera and translation, rotation, and scale of that model it creates a final matrix that will be used to calculate and store transformedVertices and transformedNormals in the mesh of the model. Just as we still do for now for a single mesh. We're going to remove that code from main.odin later.
ApplyTransformations :: proc(model: ^Model, camera: Camera) {
    translationMatrix := MakeTranslationMatrix(model.translation.x, model.translation.y, model.translation.z)
    rotationMatrix := MakeRotationMatrix(model.rotation.x, model.rotation.y, model.rotation.z)
    scaleMatrix := MakeScaleMatrix(model.scale, model.scale, model.scale)
    modelMatrix := Mat4Mul(translationMatrix, Mat4Mul(rotationMatrix, scaleMatrix))
    viewMatrix  := MakeViewMatrix(camera.position, camera.target)
    viewMatrix  = Mat4Mul(viewMatrix, modelMatrix)

    TransformVertices(&model.mesh.transformedVertices, model.mesh.vertices, viewMatrix)
    TransformVertices(&model.mesh.transformedNormals, model.mesh.normals, viewMatrix)
}

TransformVertices:: proc(transformed: ^[]Vector3, original: []Vector3, mat: Matrix4x4) {
    for i in 0..<len(original) {
        transformed[i] = Mat4MulVec3(mat, original[i])
    }
}
That concludes the implementation of the model.odin file, but before we update our main.odin file, let's make a few changes in the inputs.odin.
Updating inputs.odin
We'd like to bind the up and down arrow keys to select the next and the previous model, for that we're going to pass by reference an index of currently selected model and count of all models, so we can cycle through the models similarily as we cycle trough rendering modes with left and right arrow keys, for which we have the renderMode and renderModesCount parameters.
However, that's not the only change I'd like to propose in this file. Since we now have a model, I'd rather pass the reference to a model into this procedure from the main, or to be precise, the reference of the currently selected model. The updated signature of the HandleInputs procedure will look like this:
HandleInputs :: proc(
    model: ^Model, modelIdx: ^int, modelCount: int,
    renderMode: ^i8, renderModesCount: i8,
    projType: ^ProjectionType,
    deltaTime: f32
)
Now that we pass the model in, we need to access translation, rotation, and scale via that model reference, and at the end of the procedure, add the logic for cycling through our models.
// Here's the rest of the procedure that remains unchanged.

if rl.IsKeyDown(rl.KeyboardKey.W) do model.translation.z += linearStep
if rl.IsKeyDown(rl.KeyboardKey.S) do model.translation.z -= linearStep
if rl.IsKeyDown(rl.KeyboardKey.A) do model.translation.x += linearStep
if rl.IsKeyDown(rl.KeyboardKey.D) do model.translation.x -= linearStep
if rl.IsKeyDown(rl.KeyboardKey.E) do model.translation.y += linearStep
if rl.IsKeyDown(rl.KeyboardKey.Q) do model.translation.y -= linearStep

if rl.IsKeyDown(rl.KeyboardKey.J) do model.rotation.x -= angularStep
if rl.IsKeyDown(rl.KeyboardKey.L) do model.rotation.x += angularStep
if rl.IsKeyDown(rl.KeyboardKey.O) do model.rotation.y += angularStep
if rl.IsKeyDown(rl.KeyboardKey.U) do model.rotation.y -= angularStep
if rl.IsKeyDown(rl.KeyboardKey.I) do model.rotation.z += angularStep
if rl.IsKeyDown(rl.KeyboardKey.K) do model.rotation.z -= angularStep

if rl.IsKeyDown(rl.KeyboardKey.KP_ADD) do model.scale += linearStep
if rl.IsKeyDown(rl.KeyboardKey.KP_SUBTRACT) do model.scale -= linearStep

// Here's the rest of the procedure that remains unchanged.

if rl.IsKeyPressed(rl.KeyboardKey.UP) {
    modelIdx^ = (modelIdx^ + modelCount - 1) % modelCount
} else if rl.IsKeyPressed(rl.KeyboardKey.DOWN) {
    modelIdx^ = (modelIdx^ + 1) % modelCount
}
Updating main.odin
Finally, just a few changes in main.odin separate us from completing not just today's part but the entire series. Let's start from the top of the main procedure. Remove the mesh and the texture; we're not going to need them as we replace them now with the cube and monkey models that we create using our new LoadModel procedure.
cube := LoadModel("assets/cube.obj", "assets/box.png")
monkey := LoadModel("assets/monkey.obj", "assets/uv_checker.png")
Now that we have these two models, let's set their initial positions, and in the case of themonkey, also change the rotation and the wireColor. Then store them both in a slice named models.
cube := LoadModel("assets/cube.obj", "assets/box.png")
monkey := LoadModel("assets/monkey.obj", "assets/uv_checker.png")

cube.translation = {-1.25, 0.0, 0.5}
monkey.translation = {1.5, 0.0, 0.5}
monkey.rotation = {180, 0.0, 0.0}
monkey.wireColor = rl.RED

models := []Model{cube, monkey}
After creating the zBuffer, we have translation, rotation, and scale; we don't need those either, so let's remove these three lines. Instead, we need to keep an index of the currently selected model, we need a model count, and a selected model, which initially will be the first element of the models. I've put the following code after the line where we call the MakeOrthographicMatrix procedure, but anywhere between the main loop and the line where we define models would be fine.
selectedModelIdx := 0
modelCount := len(models)
selectedModel := &models[selectedModelIdx]
Then, just before the main loop, we need to apply transformations for all models, because in the main loop, we're going to do that just for the selected one. Without the following for loop, we'd see initially only the first model rendered until we select the next one.
for &model in models {
    ApplyTransformations(&model, camera)
}
Before we forget, let's scroll to the very bottom of the main.odin file and remove the ApplyTransformations procedure from there. We have a new version that we call here defined in model.odin.
Now scroll back to the beginning of our main loop, and after calling the rl.GetFrameTime()procedure, assign to selectedModel the reference to a model from models based on the selectedModelIdx. After that, pass the selectedModel, &selectedModelIdx, and modelCount instead of &translation, &rotation, and &scale that are no longer defined, to the HandleInputs procedure, and then call the ApplyTransformations again, but this time only for the selected model.
selectedModel := &models[selectedModelIdx]

HandleInputs(selectedModel, &selectedModelIdx, modelCount, &renderMode, renderModesCount, &projectionType, deltaTime)

ApplyTransformations(selectedModel, camera)
After the switch over the projectionType, we define translationMatrix, rotationMatrix, scaleMatrix, modelMatrix, and viewMatrix, and then we call the old version of ApplyTransformations twice. Now we don't need to do any of that anymore. Since this is handled by the new version of the ApplyTransformations procedure, simply remove all these 8 lines of code.
The very last thing we need to do is to wrap our switch over selected renderMode in a for loop over all models, and in our calls of entry procedures for all rendering pipelines, we need to access parameters that were previously local via the model in each iteration over models. This will ensure all models will be drawn on the screen. We also want to replace the rl.GREEN argument that we pass to both calls of DrawWireframe with model.wireColor and rl.WHITE in other procedures with model.color. Here's the updated piece of code:
for &model in models {
    switch renderMode {
        case 0: DrawWireframe(model.mesh.transformedVertices, model.mesh.triangles, projectionMatrix, projectionType, model.wireColor, false, &renderImage)
        case 1: DrawWireframe(model.mesh.transformedVertices, model.mesh.triangles, projectionMatrix, projectionType, model.wireColor, true, &renderImage)
        case 2: DrawUnlit(model.mesh.transformedVertices, model.mesh.triangles, projectionMatrix, projectionType, model.color, zBuffer, &renderImage)
        case 3: DrawFlatShaded(model.mesh.transformedVertices, model.mesh.triangles, projectionMatrix, projectionType, lights, model.color, zBuffer, &renderImage, ambient)
        case 4: DrawPhongShaded(model.mesh.transformedVertices, model.mesh.triangles, model.mesh.transformedNormals, lights, model.color, zBuffer, projectionMatrix, projectionType, &renderImage, ambient2)
        case 5: DrawTexturedUnlit(model.mesh.transformedVertices, model.mesh.triangles, model.mesh.uvs, model.texture, zBuffer, projectionMatrix, projectionType, &renderImage)
        case 6: DrawTexturedFlatShaded(model.mesh.transformedVertices, model.mesh.triangles, model.mesh.uvs, lights, model.texture, zBuffer, projectionMatrix, projectionType, &renderImage, ambient)
        case 7: DrawTexturedPhongShaded(model.mesh.transformedVertices, model.mesh.triangles, model.mesh.uvs, model.mesh.transformedNormals, lights, model.texture, zBuffer, projectionMatrix, projectionType, &renderImage, ambient2)
    }
}
Yes, we could've passed in these procedures just as a reference to the selected model, and we did with the HandleInputs, but in that case, we'd also have to update the implementation of all these procedures without actually learning anything new, so I decided to spare us from such a mundane work, but if you really want to, feel free to do that as a coding excercise.
And this last change also wraps (pun intended) both the implementation in this part and in the entire series. If you now build and run our software renderer (odin run . -o:speed), you should see the cube and monkey models, each with a different texture. Initially, you should be able to move, rotate, and scale the cube. After you press the up or down arrow once, the selected model will be the monkey, and you should be able to move, rotate, and scale that one instead, so give it a try.
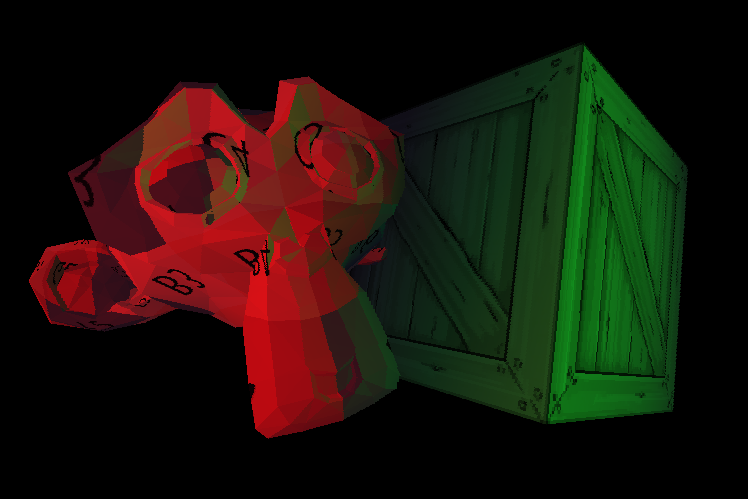
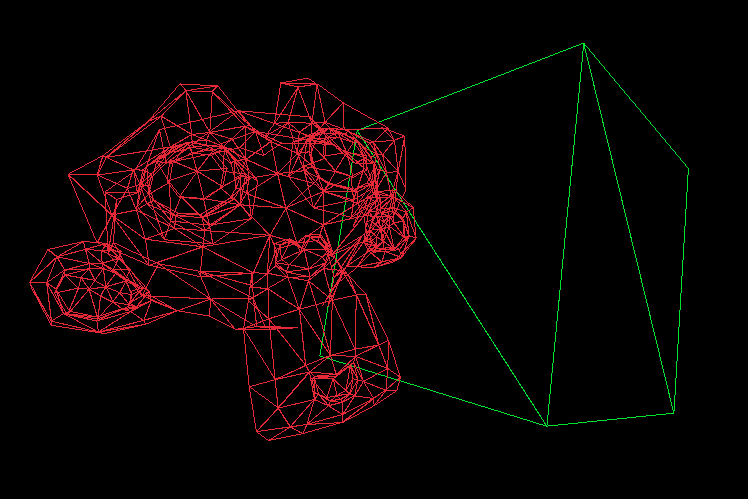
You should also be able to still cycle through all rendering modes using the left and right arrow, and in wireframe modes, you should see the cube wires rendered with a green color while the monkey's with the red, as in the following image.
Here's the complete key mapping:
- [W], [S], [A], [D], [Q], [E] move the selected model forward, backward, to the left, to the right, upward, and downward, respectively.
- [I], [K], [L], [J], [O], [U] rotate the selected model along its local X, Y, and Z axes in pairs clockwise and counterclockwise, respectively.
- Numpad [+] and Numpad [-] scale the selected model up and down, respectively.
- [Left] and [Right] Arrows cycle trough rendering modes down and up, respectively.
- [Up] and [Down] Arrows select the next and previous model, respectively.
- Numpad [1] sets the projection to orthographic.
- Numpad [0] sets the projection to perspective.
If something doesn't work as expected, you can always refer to this GitHub repository, where you now find 14 directories, each containing the end state of the project after each part of this series.
A Few Words about Z-Buffer
One last thing, if you are wondering why the monkey is not always drawn in front of the cube, which would be incorrect, if we draw our models sequentially, and the monkey is drawn after the cube, notice that we share a single z-buffer, also known as the depth buffer. This solves the problem for multiple models just as it solves it for one, since we clear the buffer at the end of the frame, after all models are drawn. We've been implementing and talking about the z-buffer in depth (pun not intended) in Part VI.
Conclusion
And that's really everything for the entire series; it took me a year to write it, and so far it's the longest series of tutorials I've written. I've been working on it mostly during weekends and sometimes during evenings and even nights, though recently I tried not to do that and rather get some good sleep. I lost count of how many hours I've spent on it, but here it is, for everyone, for free, no ads, no paywall, just pure knowledge sharing. If you followed along the whole time, I'm very proud of you, and you've learned a lot.
I learned a lot as well, in fact, especially about Odin, which is a wonderful language, and I wish it were more widely adopted. I believe it might be one day, and I hope that by writing this series, I did a little bit for that as well.
There's still a lot more I'd like to learn, and there are many, many people who know more than me about rendering, Odin, and programming in general. What I want to point out here is that this isn't the best, most optimal software renderer ever written. Far from it. There's much that could've been done to make it run smoother, make the shading nicer, it could've supported more formats, and I know about a few subtle bugs that occur in some edge cases, and I'm sure there are more of them I don't even know about.
I did my best to proofread every part, and I often checked if even those statements of which I was sure were right are indeed right and accurate, but if you find any errors or inaccuracies, please report them to me via e-mail or just send me how you like or dislike the series, I'd love to hear that.
Apart from the GitHub repository specifically for this series, linked above and at the end of every part, there's also the original repository, where I implemented most of this software renderer in Odin before I started writing this series, and it is roughly in the same state as the implementation after this final part in the Part 14 directory.
There's also a repository with reimplementation into the C language that uses SDL3 instead of raylib. It might serve as an interesting comparison or as another learning material. Now, please excuse me, I have to think about what I'm going to write about next :-).
Enjoyed this article? Support my work ❤️
All content on this blog, which I've already put hundreds of hours into, is and always will be free.
No ads. No paywalls. No tricks.
I've personally paid for a lot of educational content, but I strongly believe knowledge should be accessible to everyone.
I also pay to keep this blog up and running, and if you like what I do here, if it has helped you, and you would like to support me, you can

Even a small contribution, the price of a coffee, is very much appreciated.
Other Parts of This Series
- Software Renderer in Odin from Scratch, Part I
- Software Renderer in Odin from Scratch, Part II
- Software Renderer in Odin from Scratch, Part III
- Software Renderer in Odin from Scratch, Part IV
- Software Renderer in Odin from Scratch, Part V
- Software Renderer in Odin from Scratch, Part VI
- Software Renderer in Odin from Scratch, Part VII
- Software Renderer in Odin from Scratch, Part VIII
- Software Renderer in Odin from Scratch, Part IX
- Software Renderer in Odin from Scratch, Part X
- Software Renderer in Odin from Scratch, Part XI
- Software Renderer in Odin from Scratch, Part XII
- Software Renderer in Odin from Scratch, Part XIII
- Software Renderer in Odin from Scratch, Part XIV


